Supplies: PSP
Tube available from HERE .
Template #161 from Designs by Ali, available HERE.
Scrap Kit Birthday Kit by Classic Creations by Claudia available for purchase HERE.
Scrap Kit Birthday Kit Add-on (freebie) available HERE.
Open template; hit Shift D to duplicate template. Close the original template. Delete the designer’s information.
Select Raster 1 and Flood Fill White.
Open paper 6 and resize by 20%. Edit copy. On the template select Raster 2. Selections, Select All; Selections Float; Selections Defloat; Edit Paste as a New Layer; Selections Invert; delete using the delete key on the keyboard. On the layers palate, select the new layer, merge down. Select None. Apply drop shadow of your choice.
Open paper 8 and resize by 20%. Edit copy. On the template select Raster 3. Selections, Select All; Selections Float; Selections Defloat; Edit Paste as a New Layer; Selections Invert; delete using the delete key on the keyboard. On the layers palate, select the new layer, merge down. Select None.
Open paper 9 and resize by 20%. Edit copy. On the template select Raster 4. Selections, Select All; Selections Float; Selections Defloat; Edit Paste as a New Layer; Selections Invert; delete using the delete key on the keyboard. On the layers palate, select the new layer, merge down. Select None. Apply drop shadow of your choice.
Open paper11 and resize by 22%. Edit copy. On the template select Raster 5. Selections, Select All; Selections Float; Selections Defloat; Edit Paste as a New Layer; Selections Invert; delete using the delete key on the keyboard. On the layers palate, select the new layer, merge down. Select None. Apply drop shadow of your choice. Repeat with Raster 8.
Open paper 13 and resize by 22%. Edit copy. On the template select Raster 6. Selections, Select All; Selections Float; Selections Defloat; Edit Paste as a New Layer; Selections Invert; delete using the delete key on the keyboard. On the layers palate, select the new layer, merge down. Select None. Apply drop shadow of your choice.
Open paper 12 and resize by 22%. Edit copy. On the template select Raster 7. Selections, Select All; Selections Float; Selections Defloat; Edit Paste as a New Layer; Selections Invert; delete using the delete key on the keyboard. On the layers palate, select the new layer, merge down. Select None. Apply drop shadow of your choice.
Layer New Raster Layer; chose a color from the kit, I chose the yellow from paper number 12. Flood fill this new layer with that color. Copy and then hide that layer.
Select Raster 9. Selections, Select All; Selections Float; Selections Defloat; Edit Paste as a New Layer; Selections Invert; delete using the delete key on the keyboard. On the layers palate, select the new layer, merge down. Select None. Delete the colored layer you just used.
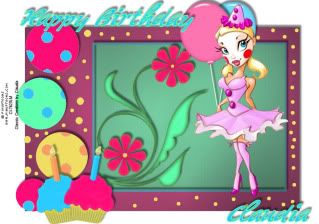
Copy and paste the tube. If using the one I used, resize by 95%. Place tube over on the right side of the frame (see example). If using the tube I used, place the high heels on the edge of the frame.
Open two balloons. Resize each by 20%. Copy and paste one of the balloons behind the tube layer. Image Free Rotate right 10% and place as if the tube is holding the balloons. Copy and paste the other balloon. Image Free Rotate left 10% and place next to the other balloon. Add drop shadow to both balloons.
Select Flower 4 (from the Add-On kit). Resize by 35%. Copy and paste onto left side of the frame. Drop shadow.
Open the two cupcakes and resize each by 20%. With one cupcake Image Free Rotate left 10% and place on the bottom left of the tag. With the cupcake Image Free Rotate right 10% and place slightly on top of the other cupcake. Drop Shadow.
Choose two colors from the kit and with font of your choice (I used Big Brush One), write Happy Birthday (or whatever you wish). Drop shadow.
Add copyright information and your name.
Merge layers.
Thanks for using my tut!
Claudia


No comments:
Post a Comment