Friday, April 10, 2009

Tags made with Sisters

The group I made this for was very busy with my kit. Here are some of the tags made with my kit. Aren't they great!!

Photobucket

Photobucket

Photobucket

Tag made with Sisters kit

I made this last night for the scrap kit game for the group I made the kit for.

Photobucket

I also want to share a great blog I found last night. The woman makes some awesome frames, templates, masks, and kits, and has some great tuts on her site, too. Check her out: Urban Fairy Tales.
Both the mask and the template in this tag is from her blog.

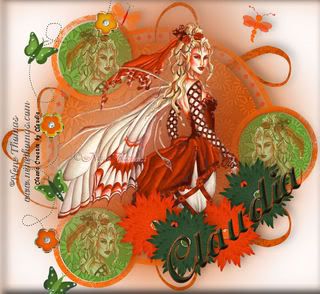
Tut with Orange Grove

Photobucket

Template by Bittersweet Designs, template #1, available HERE

Tube by Nene Thomas, Fairy Red, available at Artists that Allow.

Scrap kit by Classic Creations by Claudia. You can purchase HERE

I did not use a lot of screen shots with this tut, everything seem pretty straight forward, but if you have any questions, don't hesitate to e-mail me: clewing53@gmail.com.

Open the template, and delete the top layer with the designer’s logo. Add a New Raster Layer and flood fill white. Move to the bottom.

Select Raster 2. Selections—Select All; Selections—Float; Selections—Invert; Open Paper 9, copy paper and paste as new layer on your template. Hit the delete key on your keyboard. Selections—Select None. Delete the original template layer. Add Drop Shadow of choice. Duplicate, move down on top of white layer. Images Resize 120%, add Effects—Texture Effects—Mosaic Glass with settings: Number of columns and rows: 50, Symetric, Glass Curvature 50, Edge Curvature 0, Grout width 2, Grout diffusion 50. Adjust—Gaussian blur 50.

Select Raster Layer 7. Selections—Select All; Selections—Float; Selections—Invert. Open Paper 10, copy paper and paste as new layer on your template. Hit the delete key on your keyboard. Selections—Select None. Delete the original template layer. Add Drop Shadow of choice.

Select Raster 3. Selections—Select All; Selections—Float; Selections—Invert; Open Paper 13, copy paper and paste as new layer on your template. Hit the delete key on your keyboard. Selections—Select None. Delete the original template layer. Add Drop Shadow of choice.

Select Raster Layer 5. Selections—Select All; Selections—Float; Selections—Invert; Open Paper 13, copy paper and paste as new layer on your template. Hit the delete key on your keyboard. Selections—Select None. Delete the original template layer. Add Drop Shadow of choice.

Select Raster Layer 8. Selections—Select All; Selections—Float; Selections—Invert; Open Paper 3, copy paper and paste as new layer on your template. Hit the delete key on your keyboard. Selections—Select None. Delete the original template layer. Add Drop Shadow of choice.

Select Raster Layer 4. Selections—Select All; Selections—Float; Add color #f04508, or another color from scrap kit or tube, using Color Changer (under the Flood Fill). Select None. Add Drop Shadow of choice.

Open tube. If using the Red Fairy, recolor to the orange using the Color Changer. Copy and paste tube. Resize as necessary. Duplicate tube. Select the bottom of the two tube layers and resize 120%, add Effects—Texture Effects—Mossiac Glass with same settings as above. Adust—Gaussian blur 50. Add a Drop Shadow to the top layer.

Open and copy Flower 1 and Flower 3, resize to 40%, duplicate each one, place around the bottom of the tube. I did this to hide the bottom edge of my tube. Add a Drop Shadow on each flower.

Using Selection Tool—Circle, make a selection around your tube’s face. Copy; paste as new layer. Using your Pick Tool, resize the circle to fit in one of the three outer circles on the template. Reduce Opacity to around 50. Duplicate twice and place on the other outer circles. Mirror one or more if you would like.

Open Butterflies 1 (in elements) and copy and paste as a new layer. Position to the far left side of the tag. Add Drop Shadow.

Copy Ladybug 1 and Paste as a New Layer. Resize to 5%. Duplicate one or two times and place ladybugs on flowers, angle slightly in different directions. Add a Drop Shadow.

Copy Dragonfly 2 and Paste as a New Layer. Resize to 15%. Place where you want and angle slightly. Add Drop Shadow.

Copy Butterfly 4 and Paste as New Layer. Resize to 15%. Place where you want and angle slightly. Add Drop Shadow.

Add your copyright information and name (I used Magellan Script SSK with foreground orange, background/fill green, then added Eye Candy Bevel to it).

Thank you for your interest in my tut and scrap kit.

Claudia

Tut with Dream a Little Dream of Me

Originally published February 8, 2009

Photobucket

Requirements:

PSP
My scrap kit, available for purchase here: Dream a Little Dream
Tube of choice. I used Hellonlegs tube, available here [You can snag her NEW PSP tubes here]: Hellonlegs at ATA

For animation (animation is optional):
Animation Shop
Eye Candy 4000

If using the Hellonlegs tube, recolor the dress to match one of the colors of the kit. To recolor, use the Color Changer Tool--under Flood Fill. Using the Freehand Selection Tool (with Freehand selected) circle the artist's copyright information, Edit--Cut, Edit--Paste as a New Image. We will save this to add to the completed tag for the copyright info.

Open a frame of your choice. Shift D to copy. Close the original. Resize to 80%. Using the Magic Wand, click inside the frame. Selections--Modify--Expand by 30. Open a New Raster Layer. Select a paper of choice, Edit--Copy, Edit--Paste into the Selection. Selections--None. Move layer with the paper below the frame.

Copy the tube and paste as a new layer on top of the frame. Move up slightly, so the top of her head is above the frame. Open a New Raster Layer over the tube. Select the frame layer to work with. Using the Freehand Selection Tool (with Freehand selected) trace around the bottom half of the frame in a large U.

Photobucket

Edit--Copy, select the New Raster Layer, Edit--Paste Into Selection. Selections--None. Select the tube layer and apply a shadow of your choice. Merge--Visible.

Open a New Image 700 x 700, transparent. Flood Fill White. Edit--Copy the tube/frame; Edit--Paste as a New Layer on the New Image. Duplicate this layer. On the bottom of the two copies, Image--Resize 115%; Adjust--Blur--Gaussian Blur 20.

Select top layer, Merge--Down. Apply Drop Shadow. Move tube/frame down slightly.

Open the Danglers (hearts) of choice. Edit--Copy; select bottom layer (white layer). Selections--Select All; Edit--Paste Into Selection; Selections--None. Apply Drop Shadow.

Add butterflies, or any other elements you might want. Apply drop shadow.

Add copyright information. Merge Visible. Add text. Merge down. I used the font Dominque, but you can use any text you like.

Open candle of choice. Edit--Copy; Edit--Paste as a New Layer. Resize to 60%. Place candle to the left of the tube/frame, making it even with the bottom of the frame. Layer--Duplicate; Image--Mirror. Merge down (where both candles are on one layer). Apply drop shadow.

ANIMATION

Zoom in where you can see the flame on the candles better. Layers--Duplicate two times. Select the top layer of flames. Use your Magic Wand set on Mode--Remove, Match mode--Color, Tolerance 15, Contiguous and Use All Layers unchecked. With your Magic Wand, click on the orange part of the flame. Hold down your Shift key and click on the top (reddish) part of the flame.

Photobucket

Select Effects--Eye Candy 4000--Fire and use these settings: Column Length 200, Flame Width 100, Side Taper 40, Movement 90. check Denser Flames.

Select the second layer of the candles, repeat the Eye Candy Fire effect, but hit "Random Seed." Repeat for the third layer of the candles. Selections--None.

Select the tube/frame layer. Layers--Duplicate twice. Rearrange the layers to where you have a candle layer on top of each tube/frame layer.

Photobucket

Merge each candle layer down to the tube/frame layer beneath it.

Save as PSP Animation Shop.

Open image in Animation Shop. View Animation and see if you want to adjust the speed of the flame any (Animation--Frame Properties).

This is now where I like to add my text for my name. Type your text in PSP, Edit--Copy. Return to Animation Shop. Edit--Paste as New Animation. Edit--Copy. Go to the main image to add your text, Edit--Select All; Edit--Propagate Paste; edit--Paste Into Selection and place the text where you want it to be on the image.

Save file as GIF.

Thank you for your interest in my tut.

Claudia


Tags made with my Valentine Kit

I am working on a new kit inspired by a tube I was using. However, school work is keeping me pretty busy, my husband's been sick, too (he's disabled), and we had company come in for three days last week. Plus on Friday, January 17 our dog, Rick, died, so that kind of set us back, too. We'd had him for almost 12 years, since he was a puppy. So, my PSPing has had to take a back seat for the past couple weeks. I have lots of homework this weekend, but I'll try and get the kit finished during the early part of the week.

Here is one that I did with my Valentine kit:

Photobucket

Here are some of the tags people have made me using my Valentine's Day Kit.

By Inspires Deception:
Photobucket

Photobucket

By Sharon:
Photobucket

By Indy Angel:
Photobucket

By Tina:
Photobucket

By Linda:
Photobucket

Tags done with one of my kits

Originally posted January 4, 2009.

First, I want to post one that I did of my granddaughter. Her mom said she thought that those colors really looked good with her, and so I made a tag with her photo, and I think she was right!

Photobucket

These next tags were made by talented women in my tagging group:

Jill:

Photobucket

Erin:

Photobucket

Tina:

Photobucket

Indy Angel:

Photobucket

And here are two that I made:

This one was from a tut challenge in a different tagging group. It was one with a "use any scrap kit:"

Photobucket

I wasn't real happy with the way it turned out, so I switched around the background some, and like it much better:

Photobucket

Creations by Linda with the kit named for her

Linda didn't waste any time using the scrap kit. Here are two tags she made. One she made for my tagging group, the other she posted in my MySpace comments. Thanks, Linda. They are lovely.

Photobucket

Photobucket