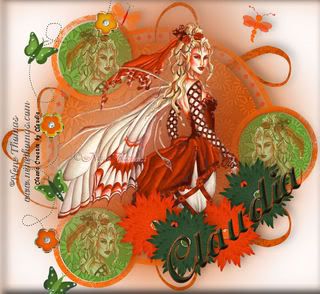
Template by Bittersweet Designs, template #1, available HERE
Tube by Nene Thomas, Fairy Red, available at Artists that Allow.
Scrap kit by Classic Creations by Claudia. You can purchase HERE
I did not use a lot of screen shots with this tut, everything seem pretty straight forward, but if you have any questions, don't hesitate to e-mail me: clewing53@gmail.com.
Open the template, and delete the top layer with the designer’s logo. Add a New Raster Layer and flood fill white. Move to the bottom.
Select Raster 2. Selections—Select All; Selections—Float; Selections—Invert; Open Paper 9, copy paper and paste as new layer on your template. Hit the delete key on your keyboard. Selections—Select None. Delete the original template layer. Add Drop Shadow of choice. Duplicate, move down on top of white layer. Images Resize 120%, add Effects—Texture Effects—Mosaic Glass with settings: Number of columns and rows: 50, Symetric, Glass Curvature 50, Edge Curvature 0, Grout width 2, Grout diffusion 50. Adjust—Gaussian blur 50.
Select Raster Layer 7. Selections—Select All; Selections—Float; Selections—Invert. Open Paper 10, copy paper and paste as new layer on your template. Hit the delete key on your keyboard. Selections—Select None. Delete the original template layer. Add Drop Shadow of choice.
Select Raster 3. Selections—Select All; Selections—Float; Selections—Invert; Open Paper 13, copy paper and paste as new layer on your template. Hit the delete key on your keyboard. Selections—Select None. Delete the original template layer. Add Drop Shadow of choice.
Select Raster Layer 5. Selections—Select All; Selections—Float; Selections—Invert; Open Paper 13, copy paper and paste as new layer on your template. Hit the delete key on your keyboard. Selections—Select None. Delete the original template layer. Add Drop Shadow of choice.
Select Raster Layer 8. Selections—Select All; Selections—Float; Selections—Invert; Open Paper 3, copy paper and paste as new layer on your template. Hit the delete key on your keyboard. Selections—Select None. Delete the original template layer. Add Drop Shadow of choice.
Select Raster Layer 4. Selections—Select All; Selections—Float; Add color #f04508, or another color from scrap kit or tube, using Color Changer (under the Flood Fill). Select None. Add Drop Shadow of choice.
Open tube. If using the Red Fairy, recolor to the orange using the Color Changer. Copy and paste tube. Resize as necessary. Duplicate tube. Select the bottom of the two tube layers and resize 120%, add Effects—Texture Effects—Mossiac Glass with same settings as above. Adust—Gaussian blur 50. Add a Drop Shadow to the top layer.
Open and copy Flower 1 and Flower 3, resize to 40%, duplicate each one, place around the bottom of the tube. I did this to hide the bottom edge of my tube. Add a Drop Shadow on each flower.
Using Selection Tool—Circle, make a selection around your tube’s face. Copy; paste as new layer. Using your Pick Tool, resize the circle to fit in one of the three outer circles on the template. Reduce Opacity to around 50. Duplicate twice and place on the other outer circles. Mirror one or more if you would like.
Open Butterflies 1 (in elements) and copy and paste as a new layer. Position to the far left side of the tag. Add Drop Shadow.
Copy Ladybug 1 and Paste as a New Layer. Resize to 5%. Duplicate one or two times and place ladybugs on flowers, angle slightly in different directions. Add a Drop Shadow.
Copy Dragonfly 2 and Paste as a New Layer. Resize to 15%. Place where you want and angle slightly. Add Drop Shadow.
Copy Butterfly 4 and Paste as New Layer. Resize to 15%. Place where you want and angle slightly. Add Drop Shadow.
Add your copyright information and name (I used Magellan Script SSK with foreground orange, background/fill green, then added Eye Candy Bevel to it).
Thank you for your interest in my tut and scrap kit.
Claudia


No comments:
Post a Comment