

Requirements:
PSP
My scrap kit, available for purchase here: Dream a Little Dream
Tube of choice. I used Hellonlegs tube, available here [You can snag her NEW PSP tubes here]: Hellonlegs at ATA
For animation (animation is optional):
Animation Shop
Eye Candy 4000
If using the Hellonlegs tube, recolor the dress to match one of the colors of the kit. To recolor, use the Color Changer Tool--under Flood Fill. Using the Freehand Selection Tool (with Freehand selected) circle the artist's copyright information, Edit--Cut, Edit--Paste as a New Image. We will save this to add to the completed tag for the copyright info.
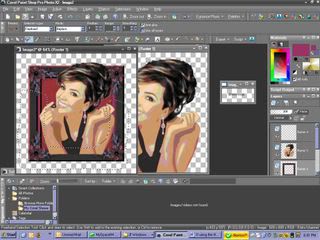
Open a frame of your choice. Shift D to copy. Close the original. Resize to 80%. Using the Magic Wand, click inside the frame. Selections--Modify--Expand by 30. Open a New Raster Layer. Select a paper of choice, Edit--Copy, Edit--Paste into the Selection. Selections--None. Move layer with the paper below the frame.
Copy the tube and paste as a new layer on top of the frame. Move up slightly, so the top of her head is above the frame. Open a New Raster Layer over the tube. Select the frame layer to work with. Using the Freehand Selection Tool (with Freehand selected) trace around the bottom half of the frame in a large U.

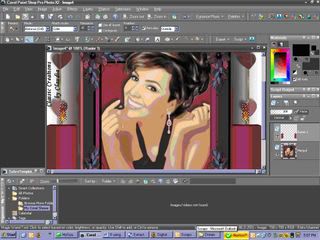
Edit--Copy, select the New Raster Layer, Edit--Paste Into Selection. Selections--None. Select the tube layer and apply a shadow of your choice. Merge--Visible.
Open a New Image 700 x 700, transparent. Flood Fill White. Edit--Copy the tube/frame; Edit--Paste as a New Layer on the New Image. Duplicate this layer. On the bottom of the two copies, Image--Resize 115%; Adjust--Blur--Gaussian Blur 20.
Select top layer, Merge--Down. Apply Drop Shadow. Move tube/frame down slightly.
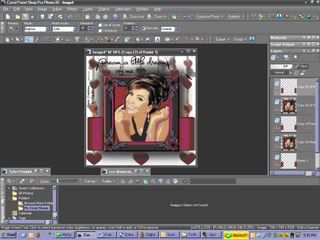
Open the Danglers (hearts) of choice. Edit--Copy; select bottom layer (white layer). Selections--Select All; Edit--Paste Into Selection; Selections--None. Apply Drop Shadow.
Add butterflies, or any other elements you might want. Apply drop shadow.
Add copyright information. Merge Visible. Add text. Merge down. I used the font Dominque, but you can use any text you like.
Open candle of choice. Edit--Copy; Edit--Paste as a New Layer. Resize to 60%. Place candle to the left of the tube/frame, making it even with the bottom of the frame. Layer--Duplicate; Image--Mirror. Merge down (where both candles are on one layer). Apply drop shadow.
Open a New Image 700 x 700, transparent. Flood Fill White. Edit--Copy the tube/frame; Edit--Paste as a New Layer on the New Image. Duplicate this layer. On the bottom of the two copies, Image--Resize 115%; Adjust--Blur--Gaussian Blur 20.
Select top layer, Merge--Down. Apply Drop Shadow. Move tube/frame down slightly.
Open the Danglers (hearts) of choice. Edit--Copy; select bottom layer (white layer). Selections--Select All; Edit--Paste Into Selection; Selections--None. Apply Drop Shadow.
Add butterflies, or any other elements you might want. Apply drop shadow.
Add copyright information. Merge Visible. Add text. Merge down. I used the font Dominque, but you can use any text you like.
Open candle of choice. Edit--Copy; Edit--Paste as a New Layer. Resize to 60%. Place candle to the left of the tube/frame, making it even with the bottom of the frame. Layer--Duplicate; Image--Mirror. Merge down (where both candles are on one layer). Apply drop shadow.
ANIMATION
Zoom in where you can see the flame on the candles better. Layers--Duplicate two times. Select the top layer of flames. Use your Magic Wand set on Mode--Remove, Match mode--Color, Tolerance 15, Contiguous and Use All Layers unchecked. With your Magic Wand, click on the orange part of the flame. Hold down your Shift key and click on the top (reddish) part of the flame.

Select Effects--Eye Candy 4000--Fire and use these settings: Column Length 200, Flame Width 100, Side Taper 40, Movement 90. check Denser Flames.
Select the second layer of the candles, repeat the Eye Candy Fire effect, but hit "Random Seed." Repeat for the third layer of the candles. Selections--None.
Select the tube/frame layer. Layers--Duplicate twice. Rearrange the layers to where you have a candle layer on top of each tube/frame layer.
Select the second layer of the candles, repeat the Eye Candy Fire effect, but hit "Random Seed." Repeat for the third layer of the candles. Selections--None.
Select the tube/frame layer. Layers--Duplicate twice. Rearrange the layers to where you have a candle layer on top of each tube/frame layer.

Merge each candle layer down to the tube/frame layer beneath it.
Save as PSP Animation Shop.
Open image in Animation Shop. View Animation and see if you want to adjust the speed of the flame any (Animation--Frame Properties).
This is now where I like to add my text for my name. Type your text in PSP, Edit--Copy. Return to Animation Shop. Edit--Paste as New Animation. Edit--Copy. Go to the main image to add your text, Edit--Select All; Edit--Propagate Paste; edit--Paste Into Selection and place the text where you want it to be on the image.
Save file as GIF.
Thank you for your interest in my tut.
Claudia


No comments:
Post a Comment